It's that time again! Time for me to make a kinda boring post about lines and stuff 1into something FUN and EXCITING!!!! Are the exclamation marks doing it for ya? Yeah, me either. In this post I will be covering the Line Colors and Line Styles tools. They look like this:
 |
I think I really enjoy using tiny icons ...
not really sure why though. |
Anyway, the first thing to cover is the Line Colors tool. This tool is almost exactly the same as the a
Fill Color tool except that it colors the outlines of shapes as opposed to the middle of shapes. So, to make this tutorial a better length I am just going to link my
Fill Color tutorial as they look and act the same. However, for sticking with me so far you get this super awesome picture of lines that had the color changed!!! Aren't you glad you stuck with me. This is a
life line altering experience. :)
 |
| OOoooo colorful lines! So exciting. |
So, enough with that line coloring stuff, lets discuss Line Style. Line style is a bit more interesting and useful as a tool. It can be used for creating fold lines, making fancy borders, adding design elements to shapes and images, cutting different portions of a project, and more. I will touch on some of these as we progress though this tutorial and others will be covered in various tutorials and projects. The tool has five different sections which will be covered below.
 |
| The tools we will be covering this tutorial. |
1. Line Style: This option allows your line to be something other than a solid line. You can make your line short dashed, long dashed, morse code dash, etc. I use this option mainly for creating fold lines in cards as seen in step 1 of my
Acorn Card project.
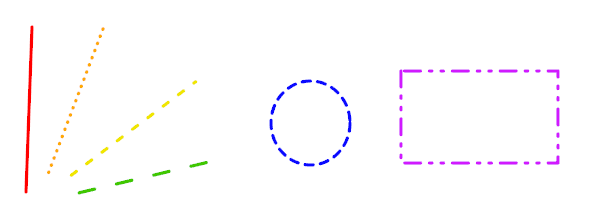 |
| Useful for making accurate fold lines, ghetto rhinestones, and more! |
2. Line thickness: This option is just what it says. It allows you to vary the thickness of your line. I have used this tool before when I didn't have the rhinestone tool available to me. By using a short dash and wide line thickness you can create circles (like the orange line below). This tool is also important if you want a line to show up when you print out your design. In the image below, the only thing that changed between this picture and the previous one was the varying line thicknesses.
 |
| Thin lines, thick lines, we got 'em all. |
3. Corner Style: This tool is used to change the corners of your shapes. It only displays when you change the thickness of your line. I like to use this tool when creating frames for scrapbooking. The three choices are corner, beveled, and rounded as shown below.
 |
| The three corner styles available to you. |
4. End Cap Style: This tool changes the way the end of a line is displayed. The line thickness must be changed for this tool and you can pick flat, square, or rounded end caps. In the image below, the line with the flat label was the starting length for all three lines. The difference between flat and square is subtle, but the square end cap actually lengthens the overall length of your line. You can see that square and rounded end caps both add extra length.
 |
| I honestly have never used this tool... perhaps one day. |
5. Position: This tool lets you move the line in front of or behind your shape. This is best explained in pictures, like the ones below, I have no idea the use for this tool... I'm working on finding out the uses for it, and when I do, you all will be the second person to know.
 |
| Both of these shapes were the same, the only difference is the position option. I'm not sure how this is different from changing the line thickness. |
Finally, there is a check box that looks like this: [] print lines of selected shape. This just alloys you to select shapes that do not have the line thickness changed and it will print that border. I have never really utilized this option, but I can see it being used for adding a bit of color to a print and cut shape. The example below shows what I am trying to explain. The bottom row of squares all have the option checked to print the border line.
 |
| It's pretty hard to see, but the bottom row has outlines that will print to paper. In the case above I took a screenshot of a PDF. |
Well, that covers everything about line color and line style. I hope you learned something. If you know of any uses for positioning the line in front vs behind the shape please let me know in the comments. Thanks for reading.