
 |
| It really is this small. |
The first portion of the tool are the basic options:

With the basic options you can easily select from a variety of colors, make a shape translucent, or choose your own color from a color already on your work area.
To begin this lesson, we will learn to color in a shape using the pre-selected colors. First, make a shape however you like making shapes. Next, select your shape. Once your shape is selected just click on the color you want.
The next thing you can do us make a shape have no color or be translucent. To make your shape translucent select your shape and click on the cross hatch square that looks like this:

Now why would you want to make something translucent? That is a great question. I have used it before when I accidentally colored in a shape and wanted to undo it. I also like to use it when making cards so I can see what a final project might look like.
For example, in the Halloween card below, all the little cut outs in the spider web and in the letters "A" and "P" are translucent. That way, if I wanted to change the background color I only have to change the color in one layer, rather than individually selecting 20+ shapes and changing the color manually.
The final part of the basic options is the eye dropper tool. It looks like this:

This tool is awesome for finding an exact color match to an image or pattern that you imported into the Silhouette program. For example, in the image below I imported a striped pattern and used the pattern for making Washi tape. But I also wanted to make some pointy circle thingys that matched the pattern. By using the eye dropper tool I am able to select the exact color from the pattern.
To do this select the shape that you want to have the new color. Next, click on the eye dropper tool. Finally, using the tool select the color that appears in your work space to match your pattern. The image below removed the eye dropper tool from the screen when I took the screenshot, but I was hovering over the brown with the tip of the eye dropper.

So that covers all the basic options. They are pretty simple, and honestly, I use them way more often than the advanced tools which look like this:

My favorite color of ALL TIME is cerulean blue. I have never learned how to say it or spell it correctly but I still love it. So if I want to make some stickers that are cerulean in color I can go to google and type in "Cerulean blue color codes". I clicked on the first link and found this:

I can use one of the three color codes to get that color in the Silhouette program.
The Hex code is probably easiest. Just enter the 6-digit code in the field after the octothorp (aka hashtag or #).

You may also enter the Red Green Blue (RGB) numbers into the corresponding box. So for cerulean it would be:

Finally you can use the Hue Saturation Lightness (HSL) numbers. The color codes above have HSV numbers which stands for Hue Saturation and Value. These number codes are different and cannot be used interchangeably.
The image below shows the correct color of cerulean on the left and the wrong HSV values plugged into the HSL spots on the right. So just be aware if you are using HSL values.

Finally, the last thing to cover in the fill color tools is transparency.

It's a very simple tool to use. Select the shape and use the slider or type in a percentage to change the transparency. 100% transparency is white. While 0% transparency is full color. You will only notice the transparency if you have a shape with a color other than white.
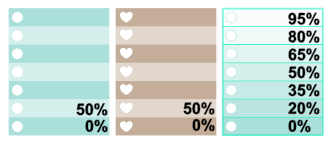
The image below is an example of using various transparencies to create different effects. The first two boxes alternate between 0% and 50% transparency while the third box has a descending percentage to create a pretty nice effect.
 That covers everything in the fill color tool. Thanks for reading! I hope you learned something. If you like any of my stickers and list boxes feel free to check out some of the stickers available on my Etsy store!
To begin this lesson, we will learn to color in a shape using the pre-selected colors. First, make a shape however you like making shapes. Next, select your shape. Once your shape is selected just click on the color you want.
 |
| At this point.... label yourself a genius. |
The next thing you can do us make a shape have no color or be translucent. To make your shape translucent select your shape and click on the cross hatch square that looks like this:
Now why would you want to make something translucent? That is a great question. I have used it before when I accidentally colored in a shape and wanted to undo it. I also like to use it when making cards so I can see what a final project might look like.
For example, in the Halloween card below, all the little cut outs in the spider web and in the letters "A" and "P" are translucent. That way, if I wanted to change the background color I only have to change the color in one layer, rather than individually selecting 20+ shapes and changing the color manually.
 |
| Translucent shapes like in between spider webs are great for making changes to background colors. |
The final part of the basic options is the eye dropper tool. It looks like this:
This tool is awesome for finding an exact color match to an image or pattern that you imported into the Silhouette program. For example, in the image below I imported a striped pattern and used the pattern for making Washi tape. But I also wanted to make some pointy circle thingys that matched the pattern. By using the eye dropper tool I am able to select the exact color from the pattern.
To do this select the shape that you want to have the new color. Next, click on the eye dropper tool. Finally, using the tool select the color that appears in your work space to match your pattern. The image below removed the eye dropper tool from the screen when I took the screenshot, but I was hovering over the brown with the tip of the eye dropper.
So that covers all the basic options. They are pretty simple, and honestly, I use them way more often than the advanced tools which look like this:
My favorite color of ALL TIME is cerulean blue. I have never learned how to say it or spell it correctly but I still love it. So if I want to make some stickers that are cerulean in color I can go to google and type in "Cerulean blue color codes". I clicked on the first link and found this:

I can use one of the three color codes to get that color in the Silhouette program.
The Hex code is probably easiest. Just enter the 6-digit code in the field after the octothorp (aka hashtag or #).

You may also enter the Red Green Blue (RGB) numbers into the corresponding box. So for cerulean it would be:

Finally you can use the Hue Saturation Lightness (HSL) numbers. The color codes above have HSV numbers which stands for Hue Saturation and Value. These number codes are different and cannot be used interchangeably.
The image below shows the correct color of cerulean on the left and the wrong HSV values plugged into the HSL spots on the right. So just be aware if you are using HSL values.

Finally, the last thing to cover in the fill color tools is transparency.
It's a very simple tool to use. Select the shape and use the slider or type in a percentage to change the transparency. 100% transparency is white. While 0% transparency is full color. You will only notice the transparency if you have a shape with a color other than white.
The image below is an example of using various transparencies to create different effects. The first two boxes alternate between 0% and 50% transparency while the third box has a descending percentage to create a pretty nice effect.
No comments:
Post a Comment