
I use the offset on almost every single project. If the project involves printing and cutting I will create an offset 99.9% of the time (example here). I also like to use the offset to make fast shapes for things like envelope stickers. So, enough of this boring chit chat, let's get the tutorial/project started already.
The offset tool has an itty bitty icon that looks like this:
 |
| I would make it larger, but then it just gets fuzzy. |
And these are the options that you can mess around with for your offset: Internal vs external, distance, and style. Don't get too excited now.
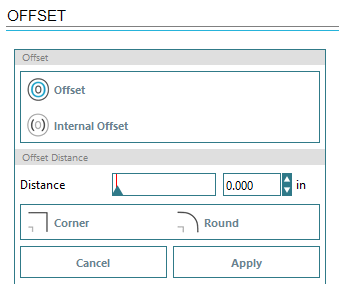 |
| Too many options to count. Or... well.. 3. There are three options. |
Let's start of with a circle, because those are easy and you already learned how to make those here. This circle is going to be a cut line for a future sticker, an epic future sticker.
 |
| I drew this myself :) |
Next, select your circle then click on the offset icon. Choose 'Offset' as opposed to 'Internal Offset'. There is a difference, and it's pretty obvious if you ask me. One makes an offset to the outside of your current shape and the other makes an offset to the inside of your current shape.
The standard offset measurement is .125 inches. You can change this by sliding the arrow on the distance bar or by entering in a number. I am going to change my offset to .025 then hit 'Enter' or 'Apply'.
 |
| First offset created. I'm basically amazing. |
Select the outer circle (the offset that was just created) and make it a no cut line. Then, fill in the offset circle with a color of your choice.

Because this is a tutorial, I guess I should cover the internal offset as well. Select the inner most circle and click on the offset tool again. This time select 'Internal Offset'.
The standard distance is .039, but I am going to make it .25 for this example. Make sure to make this new circle a no cut line.

Now this is supposed to be an epic sticker and to prove my epicness I'm going to wrap some text around the innermost circle.
 |
| Epic... right? |
Finally, to round out this tutorial I wanted to cover the difference between a corner and round offset. Luckily, the Silhouette team didn't do anything too tricky when naming these options. Below are the two different types of corners/edges an offset can have.
 |
| Corner vs rounded offsets. You do you when picking which is your favorite. |
I'm just gonna throw some stars in the center of my epic circle and BAM... that is a work of art.
 |
| I'm pretty sure small children will fight for this sticker on their chore chart. |
Now, check to make sure only your original circle is set to cut. Every other line, including text and stars need to be set to no cut lines. Then print and cut your design.
The reason we did the initial offset was to create a slightly larger border for the sticker to allow for your machine to have some wiggle room when cutting. Below is a picture of the offset after a the stickers have been removed. The offset allows the sticker to be full color instead of accidentially missing a portion of the design.
 |
| Not the best picture, but you get the idea/usefulness of an offset. |
Well, that is everything for this post. I hope you learned something or at least left with an epic sticker. Please leave any questions or future posts you would like to read in the comments. Thanks for reading.
No comments:
Post a Comment