
With digital scrapbooking becoming increasingly popular, finding patterns to use has never been easier. Just google digital scrapbooking backgrounds and check out the images to see the wide variety of things people have to offer. You can find loads of them on etsy, but there are many blogs out there offering free downloads too. Just look around!
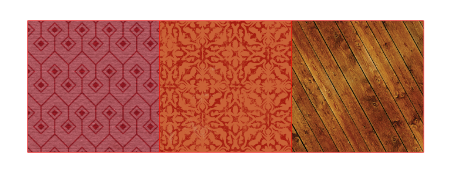 |
| Here are just a couple random patterns I found. |
I want to start this tutorial on how to import patterns into the Silhouette software. First, we need to open the library. There are three ways to do this. The easiest way for me is to click on the icon that looks like an open book located on the bottom left of the Silhouette software. The icon looks like this:
 |
| Library icon. So tiny. |
You can also open the library by going to File>Library>Library or by hitting Ctrl + Alt + L
Once your library is open it will look something similar to this:

I have added a lot of patterns, because, well... I love patterns. If you just want to import a new pattern you just have to drag and drop the file into the Patterns folder. You can also select multiple patterns at once and drag and drop the group into the program. I typically use files that end in .png but .jpg work as well.
If you want to be a bit more organized right click on the Patterns folder and select New Folder. Name the folder whatever you would like. As you import more and more patterns I would highly recommend naming folders to keep you organized.
So, lets get started with the using the awesomeness that is the pattern tool! Let's start with the basic options first... which is just choosing a pattern. Select the shape you want to add a pattern to then click on the pattern. Bam! Instant awesomeness.
 |
| The basic options let you choose a pattern. The image above is my "maps" folder. |
Well... that covers all the basic options.... next up are the advanced options. This is where the real magic happens.
 |
| Ooooo... advanced options. |
The first is mirroring the pattern over a horizontal or vertical line. I like to use this for patterns that involve chat bubbles, single objects, or a border on one side.
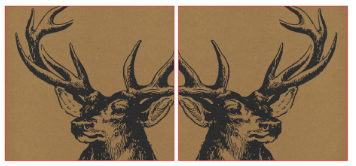 |
| I mirrored the pattern using the horizontal option. |
The next feature is making the aspect ratio fixed or stretch. A fixed aspect ratio means the size of the pattern will change as the size of the shape changes. It won't distort the image. The stretched aspect ratio will leave the pattern as is and then morph the image as the shape changes. The stretched aspect ratio will distort the image.
The image below give a visual of the differences. All the boxes in the image below started from the original square and the shapes were shortened or lengthen.
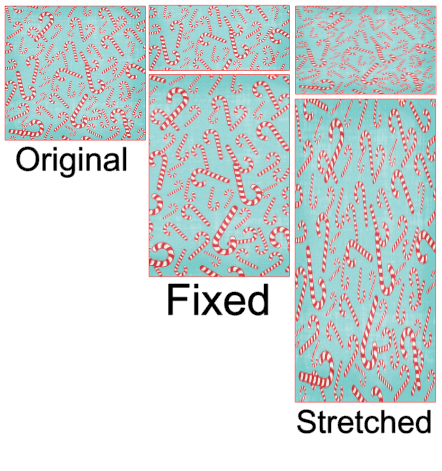 |
| The fixed aspect ratio is selected by default. I have never had a reason to use the stretched aspect ratio. |
The next advanced option is the ability to rotate the pattern. Just select the shape containing the pattern and then rotate the pattern using one of the three different options.
Option 1: Click on one of the four preset angles of 0°, 90° 180°, and 270°.
Option 2: There is a box with a horizontal red line. Click and hold your mouse button on the red line and start rotating, your pattern will rotate within the shape. In the image below I rotated it to 45°.
Option 3: Click the box to the right of the box with the red line and manually enter your desired degree of rotation. In the image below I chose 322°.
 |
| So many rotation options. I use this feature often. |
Next up is the scale pattern feature. I use this feature a lot when making washi tape, arrows, and pointy circle thingys©. This just lets you zoom in and out on a pattern.
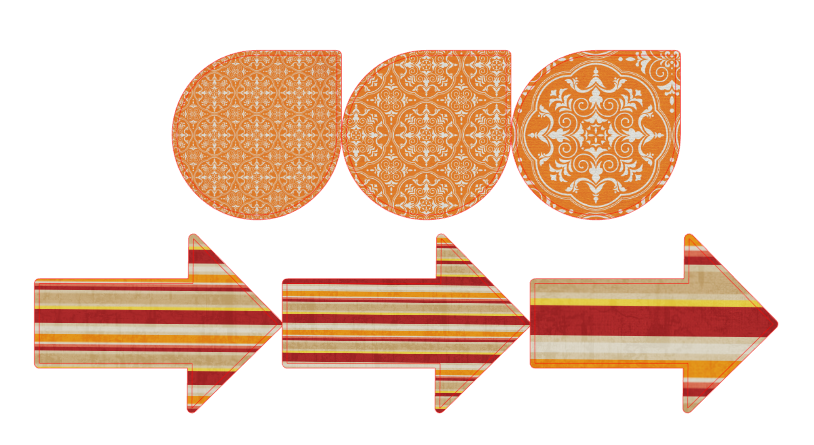 |
| I kept changing the scale of the pattern with each image. My favorite is the pointy circle thingy©. |
The next advanced option is the pan pattern tool. For some reason it is labeled as "Rotate Pattern" in the Silhouette program... but you can not rotate the pattern at all using the pan tool.
To use this tool select your shape and then click on the pan pattern tool. A tiny white circle with arrows in the middle will appear in the center of your shape. Click and hold that white circle to move your pattern around inside the shape.
In the image below, the first square is the normal pattern, the second square used the scale tool to zoom in on the pattern to about 400%. The third square was finally using the pan tool to move the center of the burst to a more visually appealing location.
 |
| I didn't actually use the pan tool until the third square. |
Last but not least, we have the final advanced tool: transparency. To use this tool select the shape and use the slider to change the transparency or manually enter the percentage. Adjusting the scale from 0% to 100% looks something like this:
| 100% transparency is dumb. Just make the square white. |
No comments:
Post a Comment