

There are two main things you can do with text. The first is your normal printing it on paper. This would be for something like a print and cut project where you don't want to hand place cut out letters. For example, I use the sticker below when I send out planner stickers from my Etsy store.
 |
 |
| I love halloween! |
The two examples above are just a couple of the uses and ways to manipulate text to create original and unique things with your Silhouette. To start off using text you'll need to know how to put it on your work area before you go and get too creative. If you have ever used paint, the process starts off very similar. Click on the little text icon on the left hand toolbar. It looks like this:

Now click anywhere in your work area. A large blinking cursor will appear. Start typing your words.


In this menu you can change the font, size, orientation, character spacing, line spacing, and kerning of words. The remainder of this blog post will cover these tools in addition to changing colors.
First, to use any of these text tools the letters must be selected. There are two different types of selecting text. The first method is the standard box that surrounds the entire word or sentence. The second selection type is specific to text only. It is a neon green box with a dark green bar at the far right side of the box. One click on the words will get you the standard box. Double clicking on the words will pull up the text specific box. The green box is the one you will usually want to edit text.
 |
| Standard selection box vs text specific selection box. |
Let's get started on some of the more interesting stuff. Double click your letters and get the neon green box to appear. Highlight your letters like you would do in Microsoft Word or on your iPhone. Click and drag your mouse over the letters you want to edit. You should have something that looks like this:

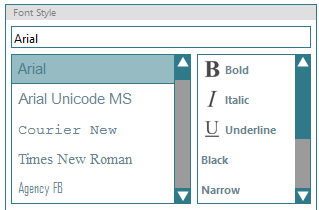
To the right of the font list are additional versions of the selected font. In the example below, Arial has the ability to also be bolded, italicized, underlined, etc. Not all fonts will have these option available to use.
To change the size of your words there are two ways to go about it. The first method is to single click on your word(s) to get the standard selection box then hover your mouse cursor over one of the corners until it changes into a double sided arrow. Click and hold your mouse button. Now adjust your font until you are happy with the size and let go of the mouse button.
The second method should be familiar as it is how you have to change font sizes in Microsoft Word. Double click the word to get the green selection box. On the far right of your work area should be section labeled 'Text Size'. Click the drop down arrow and select from the sizes shown or write in your own number just to the left of the arrow.

Character and line spacing adjust the distance between the individual letters and the distance between the lines of text if there are two or more lines. To change either spacing select the words by double clicking to get the green box to appear. Highlight the words you want to change then use the slider bars to the right or type in a percentage. The example below is of character spacing at 85%, 100% and 115%.
 |
| Changing character spacing is useful for smushing letters together so words cut out as one single word rather than a bunch of letters that you have to individually place. |
Kerning is the space between individual letters. If you imagine every letter has its own box surrounding it. The sides of the box line up exactly with the sides of the letter. When kerning is off, the boxes will not overlap. With kerning on, your boxes can overlap. Only certain letters and fonts react to having kerning turned on or off. It is a useful thing to check, but not really required.
In the example below, having kerning on caused the letters to be squished together. Some people prefer to use kerning but it is entirely a personal preference.

The last thing we will cover in this post will be changing the font color. If you don't mind the entire word being the same color then you can use the standard black selection box. If you want to make specific letters different colors you will need double click and use the neon green selection box. Select your words using the appropriate selection box. In the upper right tool bar there is a spilled paint bucket icon (highlighted in green in the image below). Now, just choose your color! Weeee!!

But now you have these red lines on the outside of your letters and you wanted the entire thing yellow. Easy stuff! With your letters still selected, click on the multicolored line tool in the upper right tool bar and pick your preferred color. The icon looks like this but much smaller:

No comments:
Post a Comment