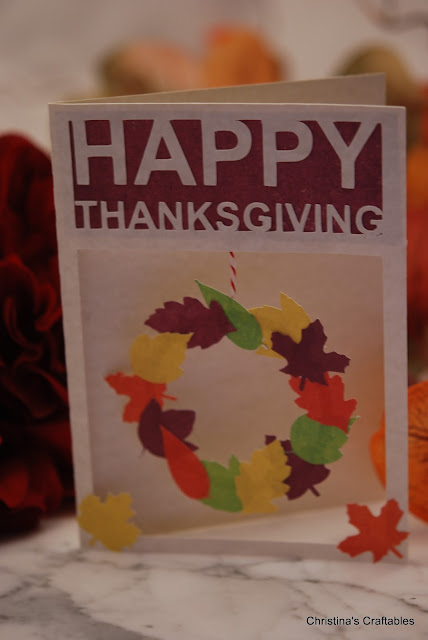
As always let's start with the finished product.
 |
| Sorry for the slight blur... I like to think of it as an artistic element... not that I need to get new glasses. |
Since I have made several other cards, I am going to jumping past the opening steps of getting the card base set up. If you want to know how to get a card base started check out my Acorn Card or Halloween Card tutorial.
 |
| The standard 8" x 5.5" card base. |
Step 1: Draw the interior portion of the card or what I refer to as the frame. I like to make the frame about a quarter of an inch narrower on all sides. My final measurements of the frame are 5" x 3.5". Set the card to the side of your work area, but leave the frame in the work area.
Step 2: Next, we need to cut the frame in half using the knife tool. Before wildly wielding the knife tool like a mad-crafter be sure to uncheck the auto apply box. Using the straight knife, draw your line across the frame and make sure it is straight. Then go to the line style tool and increase the line thickness to around 11. Your frame should now look like the image below.
 |
| Make sure auto apply is not selected when using the knife tool. |
Step 3: Go back to the knife tool menu and click on "Apply Selected Knife". Your frame should now be cut in two, leaving two rectangles.
 |
| I guess you could just make two rectangles, but the knife tool just makes it easy. |
Step 4: Use the font tool and type out "HAPPY" and "THANKSGIVING" as two separate words. Arrange your words in the top rectangle of the frame. Make sure your words overlap the edges of the frame by just a little.
 |
| In the final product I moved the word happy a bit more to the right to leave a gap. |
Step 5: Select just the top rectangle of the frame and right click. At the bottom of the menu is the option to "Send to Back". Click on that. This will send the frame to the back of the image so the words "Happy Thanksgiving" are on top. This step is REQUIRED for the next step to work.
Step 6: Select the words and the upper frame. Open the modify tools and click the "Subtract" option. You should now have the words and upper portion of the frame as one unit.
 |
| Looking good so far. |
 |
| Ooooo... a circle. |
 |
| On the left: A leaf being traced. On the right: A traced leaf. |
Step 9: This step isn't really a progress "step"... but more of a put-everything-together step. Color your leaves in with some nice fall colors just because I like to make things look pretty. Then place your wreath base in the bottom rectangle. Drag the leaves you just colored over top of the wreath to make sure you are happy with their size. Most of my leaves are about 1" x 1". Adjust anything that needs adjusting. This is basically rocket science at this point.
 |
| A progress picture to make sure I am happy with the size of the wreath and leaves. |
Step 10: Cut out the card, wreath base, and leaves. I used four different colors of patterned paper to when cutting out the leaves to add more dimension.
 |
| I made waaaaayyyy too many leaves. |
Step 11: Gather your materials. You will need:
- Cut out card
- Cut out wreath base
- Cut out leaves (I ended up with 13 leaves of 4 different colors)
- A piece of ribbon or string cut to desired length.
- Tape
- Glue
- A 1.5" x 3.75" piece of colored paper. This will be the background behind the words Happy Thanksgiving.
Step 12: Use a tiny piece of tape to attach the ribbon or string to the back side of the card underneath the word "Thanksgiving" and use another small piece of tape to attach the string or ribbon to the back of the wreath.
Step 13: Glue the 1.5" x 3.75" piece of paper behind the words. Be sure to use a little bit of glue on the words themselves.
 |
| Hellllooooo contrast! I don't normally like to use this much contrast, but I really wanted to show the glue... for some reason. |
Step 14: Glue leaves onto the wreath base. Place the leaves randomly on the circle and slowly build up as this will help it look more natural.... well as natural as paper leaves can get.
Step 15: Admire your work!
Random side notes. My first attempt at cutting the leaves was pretty bad as seen below in the picture. This was for two reasons. First, I did not properly attach the paper to the cutting mat and it was free to move around. Secondly, my knife had become dull and needed to be replaced. In the images below I have included some before and after pictures of my leaves. Note how the edges are much cleaner. It was also much easier to separate the leaves from the paper once the knife was replaced.
 |
| Before on top. After on bottom. HUGE difference. |
 |
| Close up of the bad leaves. |
 |
| Close up of the after leaves. |
Thanks for reading! I hope you enjoyed making this card. Feel free to send me your card inspirations, I would love to see what you have done. If you have anything you would like to see me craft let me know in the comments. I am always looking for ideas.


No comments:
Post a Comment