
In my previous post I covered (rather quickly) my 13 reasons for buying the Silhouette Studio Designer Edition. In this post, and in the following post I will go more a bit more in-depth about these features to help you make an informed decision about whether or not you want to buy this software.
The six features I will be covering in this post are:
1. Nesting.
2. “Adjustable pivot point rotation feature”
3. Transfer properties between shapes.
4. Eraser options.
5. Knife tool options.
6. Rhinestones.
1. Nesting!!!! As you can tell I am a bit excited about this feature. This was the reason I bought the upgrade in the first place. It basically saves you raw materials. It rotates and moves your designs so it optimizes how much you can fit in your cut area. This also means is that you can use those small scraps of leftover paper and vinyl and get as much cut out of them as possible.
I would like to point out that this feature isn't perfect. In the example below, I should clearly be able to put a fifteenth butterfly, but for some reason the nesting can't figure it out, even thought it nested two other rows of five butterflies. If I needed one more butterfly, I would just delete the row of four and duplicate a row of five in its place.
I would like to point out that this feature isn't perfect. In the example below, I should clearly be able to put a fifteenth butterfly, but for some reason the nesting can't figure it out, even thought it nested two other rows of five butterflies. If I needed one more butterfly, I would just delete the row of four and duplicate a row of five in its place.
 |
| Before I do any nesting. Twelve butterflies all nice an lined up on a 4"x 4" work area. |
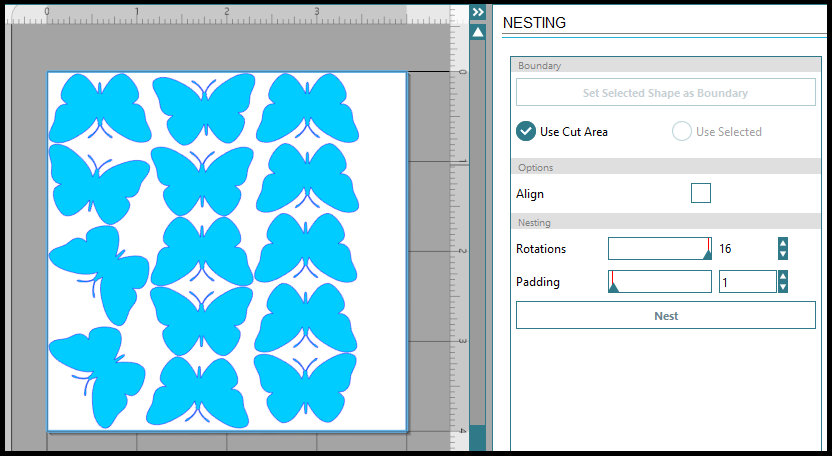 |
| After nesting. Fourteen butterflies, same size space! |
2. The “adjustable pivot point rotation feature” is complicated sounding but rather useful for creating copies of objects that are around a center point. For example, a flower. By using Ctrl+C and Ctrl+F you can copy and paste the flower petals then rotate them around a center point of your choosing, rather than having to manually place each object. Ctrl+F will place the copy directly on top of the original image.
This feature isn’t turned on by default. If you would like to turn this feature on go to Edit > Preferences > Defaults.
This feature isn’t turned on by default. If you would like to turn this feature on go to Edit > Preferences > Defaults.
 |
| A single flower petal before moving the pivot point. |
 |
| Single petal with the center point of rotation moved. |
 |
| To adjust the location of each petal use the green circle to rotate around the now moved rotation point. |
3. The fill pattern feature is really nice for when you spend a loooong time perfecting a pattern's elements (scale, rotation, transparency, etc.) and you want to transfer the same settings to a different shape. To do this select the shape that has no pattern, click the eye dropper tool located on the bottom tool bar, and then click the pattern you want to copy. BAM! Done. Waaaay less time.
 |
| The selected image contains the pattern I want to copy. The arrow is pointing to the eyedropper we will use . |
 |
| Select the blank shape, click on the eyedropper tool, and click on the pattern you want to duplicate. |
 |
| Easy peasy. |
4. Eraser options. In the free version you get a small and large version of a circle and a square. In the designer edition you get a small, medium, and large version of the circle and square, but you also get the ability to manually select whatever size you need of these two shapes. I don’t find this “feature” to be very new and exciting so I’ll leave you with a picture of the erasers and lots of exclamation points!!!!!!
 |
| So many options! The circle demonstrates the "solid" eraser option while the square demonstrates the "outline" option. |
5. Knife tools. You get a bunch more. The free version has four basic knives. The designer edition comes with seven additional ones that are demonstrated in the image below. They are useful for creating chevron patterns, waves, cutting off sections of a more complex patterns, and more.
 |
| The various knife tools that are offered in the Designer Edition. |
6. Rhinestones! This option isn’t available in the free version. This tool was created to work with actual rhinestones to aid in perfectly placeing the rhinestones for your design.
I didn't have the need to make a lot of rhinestone t-shirt art, but I found this tool to be useful in other ways. For example, string art. You know that art with a bunch of nails and lots and lots of string tying it all together? Well, this tool will make it so you can perfectly place your nails so you look like you know what you are actually doing.
I also posted a recent project blog where I use the rhinestone feature to create a fancy border. I ended up thinking I would never use the rhinestones, but I am so happy I have this feature!!!
 |
| The border was done using the rhinestone feature. Check out the project blog if you want to make your own card like this. |
So there you have it. A slightly more in-depth analysis of the first six reasons why I think the Designer Edition of Silhouette Studio is worth it. Overall, the nesting feature is less that perfect, but it does do a decent job especially when you are dealing with hundreds of cut outs. I think the biggest surprises for me were the knife tools and rhinestones. Both of these tools have many more uses than I first realized. Thanks for reading!
Check out this post here for the follow-up to this post: Reasons 7 - 13.5 for buying the Designer Edition.
Check out this post here for the follow-up to this post: Reasons 7 - 13.5 for buying the Designer Edition.
No comments:
Post a Comment